| Forum | Marketplace | Knowledge Base | | H1 site | H2 site | H3 site | |

The Hummer Knowledge Base
|
Edited by M Selig
OVERVIEW of COMPONENTS: Hummers using the 6.2L engine (92-93) were mated to a GM TH400 (3L80) 3sp automatic transmission, the heavy duty version of the ubiquitous TH350. It has 3 forward gears and 1 reverse. It can be locked in 1st, 1-2, or 1-2-3 (D). The ratios are 2.48, 1.48, and 1.00. Reverse is 2.08. From 94 on, all Hummers use the GM 4L80E 4sp automatic. This is the standard HD automatic trasmission in GM trucks. It can be locked into 1st, 1-2, 1-2-3 (D), or 1-2-3-4 (OD). The ratios are the same as the TH400 except for a 0.75 overdrive. This trans comes in HD GM 3/4 and one-ton trucks. Max input torque is 440 lbs-ft. The torque convertor is locking with a ratio of 2.2:1. Transmission fluid driven by transmission pressure of aproximately 90- 120 psi, goes through a cooler integrated with the engine oil cooler. From the cooler, the fluid goes though an intercooler loop inside the transfer case, and then back to the transmission. There is a bypass valve in circuit there to prevent the cooler fluid from all draining into the transmission pan. The Dextran in the trans is separate from the Dextran in the transfer case with separate drain plugs. All Hummers use a New Process Gear (NPG) 242 2sp TRANSFER CASE. It is a full time transfer case incorporating an open differential between the front and rear driveshafts (DS). It has 4 modes, High (H), High Locked (HL), Low (locked) (L), and Neutral (N). The ratios are 1:1 in high, 2.72:1 low. It is the same case that comes in HD 3/4-ton and 1-ton GM's (except the dually which uses a Borg Warner case) The input shaft and rear output shaft are co-linear. The front is a left-handed output, chain driven.
 In H, torque is evenly split front and rear. In HL, the differential is locked (manual locker), forcing the front are rear driveshafts to turn at the same rate. This is equivalent to a part-time 4wd system. The L position forces the input shaft to turn a planetary gear assembly at the front of the case. The ring gear is machined into the front case. Low reduces the output shaft speed by 2.72:1. The differential is always locked in low. The N position disconnects the input from the output shafts totally. The differential is open in this position. A sensor at the rear of the transfer case (TC) is used to determine speed. Another sensor determines if the TC diff is locked or unlocked, illuminating a status light. The TC is cooled via transmission fluid flowing through an intercooler inside the TC. The engine, transmission, and transfer case are rigidly connected together. The assembly is canted slightly to the right.
SERVICE: Every 12 k miles the Trans and Transfer fluids (Dextran 3) needs to be changed. This is Gerald's approach: The first obstacle for me was to remove the intermediate shield of the driveline protection. You have to remove 12 bolts and loosen 4 more. Then squish it falls on you!! Just kidding. The shield is around 70 lbs or so I would guess. Things are always hard to judge while blinking away dust lying on one's back. I loosened all of the bolts in the back (it sits on the crossmember). Then, remove the 8 bolting it to frame supports near the motor mounts. Then remove the nuts from the front bolts but leave the bolts in. I placed a jack near the center but further to the rear. Adjust jack to support shield. Then pull the bolts from the front (you should be at the front). You have the support the front. Lower the front slightly and pull towards the front. The rears "fall off" the crossmember. Lower the jack and roll it out. Next, you need to remove the crossmember. Remove the nuts connecting the transmission (rubber) mount to the xmember. Then, move the jack to the rear and support the rear of the xmission. I used a section of 4x4 between the tcase and jack. You only have to touch it. Then remove the huge nuts on the left and right bolting the xmember to the frame. Curse and yell alot as you wiggle it free. I swear these things must get longer after they are built because they are really stuck up in there. Remove the rubber mount from the xmission to expose all the pan bolts. I am one of the lucky few who have a drainplug on my pan so I don't take a bath with the stuff. Then remove the bolts except from one on the left and right centers (loosen them of course). The tricky part is that there is a bracket for the shift linkage that uses two of the pan bolts. While supporting the pan, remove the final two bolts. The exhaust crossover pipe prevents the pan from being lowered straight down. You have to lower it, and then slide it back to clear the exhaust. While doing this, you have to somehow get the pan lip out from under the shift bracket. This is the most annoying part. You just try different things until it comes out. You have to be very careful to not hurt anything in the transmission. There are wires right near the front that control the 1-2 shift solenoid that just beg to be hurt. I was forewarned of this by a friend who watched a mechanic do it (thanks Everett!!). Pull down and twist left and right to work the pickup filter free. It will pop out and start to shoot fluid down. Be sure to leave the pan under the xmission to catch the stuff. There is a rubber or hard plastic bushing (delrin?) that the filter plugs into. Just be sure it is in good condition or else replace it. The filter should have come with a new one if you need it (I did not). It is called a multi-lip seal. Discard the filter. Insert a new one. Be sure to seat it fully. There is a recess on the back that fits over the control valve. It is pretty obvious. Drain the pan. Clean and check the magnet stuck on the bottom of the pan. It just peels off the bottom. There should not be any big pieces or anything like that. You should just have the stuff that looks like sludge. Your fluid should have come out pretty red and clear. It should not be milky, bubbly, etc. Clean the gasket (just wipe it will paper towels) and the mounting flange. Ditto for the flage on the xmission too. Center up the filter and install pan. Reverse the rest. I could not get my crossmember in. I had to grind the edges down just a tad. I then got it in far enough to engage the nuts to the bolts slightly. I then moved the jack to under the xmember and helped it the rest of the way in. BTW, grinding the xmember does not seem too uncommon. The dealer had to do it to me friends truck. I measured how much fluid I took out so I put in the same amount (6 qt). Check the dipstick to be sure you are in the ball park (like on the stick someplace). Start engine, shift through gears, and check the stick. Since the xmission is obviously cold, the level should be between the two circles near the bottom (just a sanity check). Drive until hot, and check at an idle. You might as well change the transfer case fluid at the same time. There is no filter, just a plug. However, you will need a pump to refill it. The fluid should be quite dirty and brown looking (no filter).
Problems to be aware of: The Transmission Vampire!!!! The symptoms are tranny slipping or slow shifting coupled with low ATF and/or ATF leakage on the ground. The absolute confirmation of an ATF vampire is to open up the air cleaner housing. If there's ATF in the bottom of the housing, you have been infected. The cause is a leak in the transfer intercooler, such that the trans gets sucked dry. Fluid floads the transfer and central ventilation system. Thanks Scott. The Transfer Plug!! The transfer case has a rubber plug in an unthreaded hole on the left side of the case about halfway up. Both the hole and the plug are invisible behind the skid plate. If the rubber plug comes out (which it does), you both loose lubricant and unseal the transfer case. If you loose the plug and go fording water, you will contaminate the lubricant and grenade your transfer case. One should check this regularly. 4 to 2 speed Transmission!!! On an occasion the trans will lose 2 of its 4 speeds. It is most likely at throttle switch. Since the GM 4L80-E 4-speed trans is electrically controlled, rather than torque sensored, the malfunctioned throttle switch screwed up the programing of the transmission. I couldn't travel very far, so the dealer service suggested contacting a local GM dealer and tell them what kind of GM transmission I have, and check to see if they have a Tech-1 machine with a Mass Storage Cartridge. This machine can test the transmission and tell exactly what was wrong. Anyway, to replace the switch and reprogram the transmission, it cost me about $500, which I didn't flinch at because I was so relieved that I didn't have to replace the entire transmission. Thanks Dave.
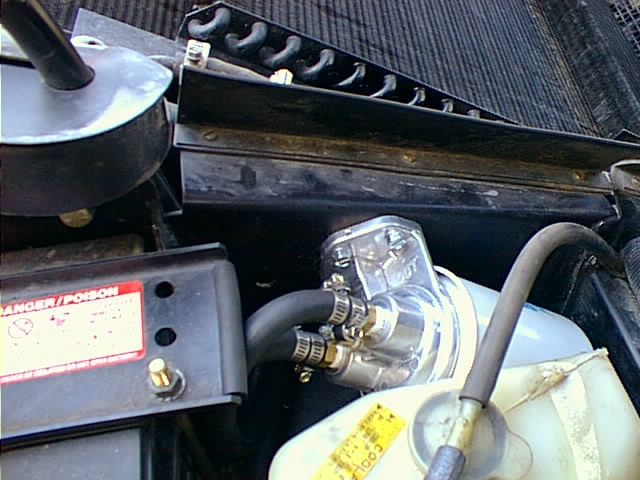
SUGGESTED MODIFICATIONS: TRANS TEMPERATURE GAUGE WITH REMOTE FILTER. Off-roading and BTM are very hard on automatic transmissions. As the the Hummer comes from the factory, we have no way to monitor the transmission temperature. If you have drive line protection, it is difficult to change the ATF. I added a drain plug to the pan, a screw on filter in the line to the Hot side into the cooler, and an ATF temperature gauge. Now, it is very easy to change ATF, draining the pan only changes about l/2 of the ATF unless you drain the converter. The pickup filter has approximately a l00-micron filtering capacity. The screw-on filters have approximately a 20-micron rating. The pickup filter will stop any large debris, the screw-on filter will remove smaller contaminents such as tarnish and debris. The pickup filter should be left on. I checked the pickup filter on my Suburban at l50 k and it still looked clean. I had changed fluid and screw-on filter every 25 k. Therefore the remote filter will keep the ATF cleaner, you will not have to disassemble part of the bottom of the wehicle to get to the pickup filter and during demanding conditions you can watch the temperature, and if it gets too high, back off and let it cool down. If it stays above normal, you can look for the problem. The inline trans filter I used was from Summit Racing Equipment, Phone: l-330-630-3030. You can buy it as a complete kit, #PRM l0677. It comes with a temp gauge also. For a drain plug, I am using a 1/2 in thread Rr20 NF magnetic plug via a bolt welded to the pan. I am told the Hummer pan is thin gauge, cadnium coded. It is not optimal to braze, but to mig weld, in case you are thinking of putting a drain plug in. The bolt-on plugs look a little ringy dinky and can come loose easy but work. I called Alan of PermaCool, Covina CA, 1-800-827-3768. He told me that the inline filter will triple or double the mileage to change the pickup filter (he is not alowed to tell me more than that). The inline filter filters tarnished fluid which the stock filter does not. It can keep the Dextron spanking clean as Charles made note.
|

|
If the inline filter is replaced every 1200 miles the pickup filter will
really never get dirty (according to a tech at Summit). It was NOT
recommended to take apart the pickup filter and remove the filter element.
The filter needs to be placed in the hot out line from the trans (since
hot fluid filters much better).
The PermaCool kit comes with every thing needed including the temp gauge, the electric sensor of which nicely screws into the filter adapter. The adapter takes an AC PF13 for tight fit and a PF2 for regular fit. I think this is a very useful and important modification.
 Transfer Case: The transfer case has not been a major problem. Some, however have removed the Rubber Plug and put a solid plug in its position. The Intercooler loop was also bypassed. This has not caused too much difference in the operating temp of the transfer case. Some have tapped the drain plug out to put in a filter sensor for the transfer fluid temp. This can be on a double pole switch with the existing trans temp gauge to save some dash mounting time and clutter.
 Happy Motoring. MS |