|
Cross-Member Modifications:
On August 20th, 1998, the Colorado Hummer Club (and several guests) assulted Blanca Peak. This trail is one of the toughest in the state of Colorado.
I was acting as trail leader. When attempting to climb the "Jaws 2" obstacle, I became high-centered. All wheels were still touching, but the center of the truck was dragging and winching was required. After hearing an unpleasant noise, I figured I better check the underside of the truck. The only damage was to the cross-member that supports the rear of the transmission. After driving for a short distance, I also noticed that the transmission shifter detents did not align quite right with the transmission detents. Not a serious problem, but one that needed checking.
Next-in-line was Doug Zirkle. Since I was already over, we hooked a tow strap to his truck, and I very carefully pulled him over the obstacle. He bent his cross-member even worse than I did, and has since replaced it. (BTW, I do not yet have the drive-line protection on my truck. Doug does have it on his.) Doug heard some slight fan-to-shroud contact, and his shifter was also mis-aligned.
After this experience, everyone decided it was time to pile some more rocks in the area. Everyone still scraped a little bit, and everyone still needed to be towed, but no one else damaged their cross-members. :-P
After the trail ride, I was discussing the cross-member damage with fellow HMLers. (Both had done the trail with us.) Charles indicated that he had had similar problems in the past, and we decided to see what we could to do prevent this from occurring again (or at least reducing the amount of damage). The shape of the cross-member seems to like to hook on things, so a two-pronged approach was devised: reinforce the leading edge (to reduce damage), and round the leading edge (to reduce the probability of catching).
After further discussion, I decided that I would try to fasten a piece of steel pipe over the front edge of the cross-member.
When I got home, I removed the cross-member from the truck. As soon as I removed the bolts that attach the mount to the transmission, the entire engine/tranny assembly moved forward about 1/8". This accounted for (and fixed) the shifter misalignment. Then, using a small shop press, I (mostly) straightened out the cross member. Then I took a piece of 1" steel gas pipe (black, not galvanized!) and slit it lengthwise with my 14" chop saw. (1" steel pipe is about 1-1/4" outside diameter.) Then I cut it to length, trimmed the corners where the pipe would interfere with the cross-member mounts on the frame, and slipped (hammered, actually) the pipe over the front of the cross-member. I then welded it into place. I used several small beads, spread along both the upper and lower side, to reduce heat warping of the cross-member and the pipe. I then re-painted the assembly, and fastened it into place on the truck.
The assembled piece does stick down a small amount below the rocker panel protection, but it does not stick down more than the drive-line protection does.
I am very please with the installation, but have not had the opportunity to test it yet.
The bolt holes where the transmission mount fastens to the cross-member are elongated. If I had realized this at the time I would have loosened them "in-the-field" to allow the engine/tranny assembly to return to the normal position relative to the shift linkages.
Dave Breggin
(click on any photo for a larger version)
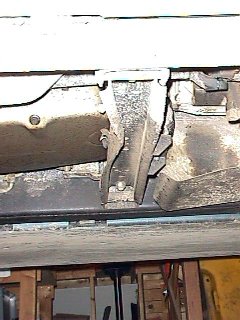
Picture of cross-member following winching myself over "Jaws 2".
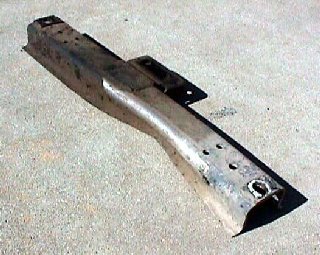
Cross-Member after removal, front view.
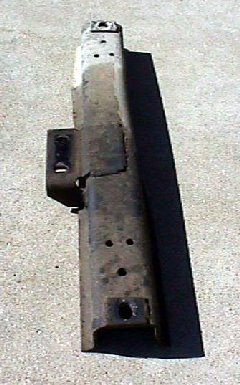
Cross-Member after removal, side (rear) view.
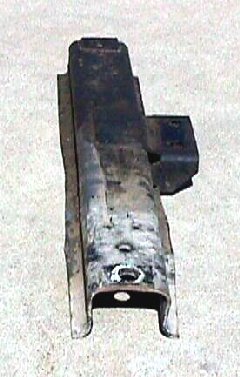
After straightening, side (front) view.
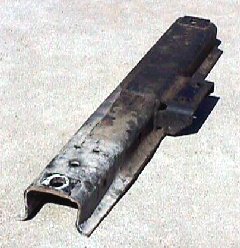
After straightening, rear view.
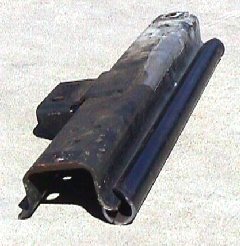
Cross-Member with reinforcing in place, prior to welding.
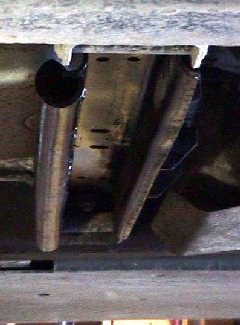
Cross-Member after re-installation.
Thanks for all the comments on the article.
Several people have asked about covering the bottom with a "skid plate".
There are several considerations when evaluating something like this.
There are several holes in the cross member-that would allow it to "fill up" during trail rides. Such a plate would have to be designed to allow most of the "muck & such" to drip/fall out. This would limit the effectiveness of such a plate. It could not be sealed well enough to completely eliminate the entry of debris, mud, & whatever.
Another conderation when reinforcing a piece of an assembly - whenever you make a piece stronger, you "chase" the stress into another part of the assembly. If you make the cross-member strong enough, it might completely rip the mounting brackets off of the frame. If you then reinforce the mounting brackets, you might damage the frame itself, etc. I did not take the time to consider the possible ramifications of such a major modification. I just made a small change to overcome a specific problem.
Third, if you make a (large) lip on the front of such a skid plate, you run the risk of changing the air flow (such as it is) in the t-case area. For those without aux coolers, this could be a problem. (Or it might improve things - tough to tell without trying.)
A possible solution to the stress problem might be to fasten a "skid
plate" to the cross-member by bolting, instead of welding. This would
have less of a tendency to transmit high stress to other areas, and
allow the plate to be serviced. Relatively small bolts should be
used - perhaps 5/16" or 3/8" standard carriage bolts. Again, if you
fasten it on too well, you could transmit the stresses to other areas.
Maybe next time...
Several people asked about attaching the reinforcing material without removing the cross-member. It could be done, but I did weld the top of the pipe to the top of the cross-member lip. This could not be done while still on the vehicle. Welding on a reinforcing plate would be more difficult as all welding would have to be on the top. It is not particularly difficult to remove the cross-member, however:
- support the t-case
- remove tranny bolts (2)
- remove cross-member bolts (2, one has two nuts & a cable thingy)
- remove cross-member
Someone also asked about mounting the pipe higher. This was not a concern for me as I plan to add the driveline protection in the near future. The driveline protection sticks down at least 1" farther than the pipe.
Dave Breggin
'95 Diesel Wagon
|