|
The Hummer Knowledge Base
Brakes/Tools:
To All:
I have some information about tools for changing the brakes on the Hummer.
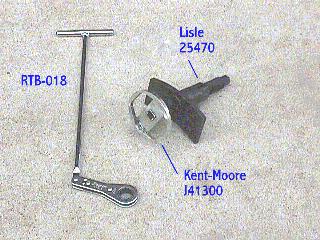
The adapter for turning and compressing the rear piston is:
- Blue Point 41IM750
- Kent-Moore J41300 ($59)
This is the adapter only. The tool to turn and press it is a separate part. (I already have one from Lisle for about $25.)
Snap-On makes a specialty tool for working the upper bolts that
hold the brake assembly in place. It is:
It is a short ratcheting box wrench (9/16") with a long "T" handle.
It is just the "cat's meow" for the upper bolts. (Looks pretty
strange!)
Hope this info helps...
Dave Breggin
'95 Diesel Wagon
Getting ready to do the rear brakes. (got a torn dust boot, so I might as well change the pads while I'm there).
The 95 manual (7-17) is not that detailed in the replacement of the pads. I hear you need a special wrench for the piston head, and a "crow's foot" for the capscrews (to 40lb-ft) Crow's foot?
I don't know about the "capscrews", but the bolts that secure the guide-pin bracket to the diff housing can be difficult to un-do. (The lowers are easy, but the uppers are hard to reach with a full-size wrench.) I use a Snap-on RTB18 on the upper bolts. This tool looks like half of a ratcheting box end wrench (9/16") fastened to a 12" long "T" handle. Works like a charm.
Anybody have P/N's for the tools they got a Sears / NAPA / Snap-on?
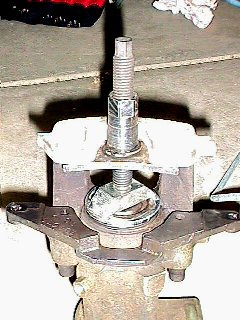
The rear pistons must be turned at the same time as they are being compressed.
(i.e. press a little, turn a little, press a little, etc. etc. etc.)
Many people have done this using a "C" clamp and a large pair of channel-lock
type pliers. The "kit" from Kent-Moore costs a bundle! I ordered the adapter
(J-41300) from them (about $60 if I remember correctly), and went to Sears for
the compression tool itself. I got a Lisle Pusher Screw (25470) for about
$12. One note: the adapter from Kent-Moore has a 1/2" square drive hole in
it, and the Lisle (and most others) have a 3/8" square drive. I fashioned an
adapter from a piece of 1/2" square tube (1/16" thick wall), and assembled
them (semi-permanently) with a hammer.
How about them Carbon-Kevlar pads? are they avail. at NAPA? Are they "the Best"?
They are "The Best". I highly recommend them. I have an off-brand (cannot
remember the numbers), but the numbers are available on the HML info page
about brakes.
Be sure to lubricate the guide pins with an appropriate lubricant (teflon,
or some type of anti-seize). This will help keep the wear even between pads
on each caliper. Also, as you compress the pistons, make sure that there
is enough room in the brake fluid resevoir for the additional fluid displaced
from the pistons. If there is not enough room, it can make a mess.
It is not necessary to remove the caliper from the vehicle. There is enough
length in the brake lines to allow in-place service. Just be sure not to
damage the lines (i.e. by hanging the caliper from them, or by crimping or
kinking them). If you do remove the caliper, it will be much easier to compress
the piston (if you do not have the right tool), but the brakes must them be
bleed after re-installation.
The first change took me about 2 hours for one brake. (I only did one brake
at that time - uneven pad wear. I did not have the special tools, and had never
done disk brakes before.) The next time I changed all the pads on the vehicle
in about 45 minutes.
Hope this helps!
Dave Breggin
'95 Diesel Wagon
Was working on another Hummer's brakes today, so I took a couple
of pictures for the "database". This one is of the special tools:

Dave Breggin
'95 Diesel Wagon

Rear Brake Compression Tool in use on Rear Caliper

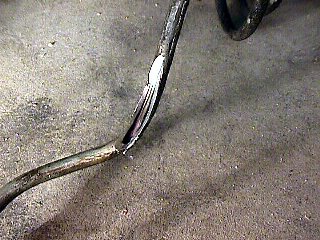
When finished, BE SURE that the brake lines are not touching the rotor, half shaft, or frame. (This shows what a few miles of rubbing on the halfshaft can do!)
Dave Breggin
'95 Diesel Wagon
|